


Overview
DNS (Domain Name System) helps connect your domain name to services such as websites, email accounts and applications. Think of it as an internet address book that directs visitors and emails to the correct servers.
If you want to connect your domain to a new hosting account, configure business email or verify your domain with a third-party service, you may need to update your DNS records.
This guide explains how to manage DNS records through your WWS account, and the different types of DNS records.
Before You Begin
Before making any changes, confirm where your domain's DNS is managed.
Your DNS may be managed by WWS, your domain registrar, Cloudflare or another hosting provider.
If your domain uses WWS nameservers, you can manage its DNS records through your WWS Dashboard. If it uses another provider's nameservers, you must make the changes through that provider instead.
Changes made in the wrong DNS management panel will affect your domain.
Step 1: Access DNS Management
To manage your DNS records through WWS, follow these steps:
Log in to your WWS Dashboard.
Navigate to Domains.
Select the domain you want to manage.
Open DNS Management or DNS Records.
Click Add Record to create a new DNS record.
Depending on the type of record you're adding, you may need to provide the following information:
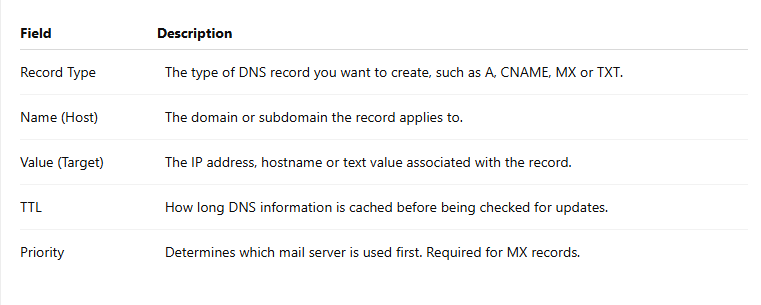
If you're unsure which TTL value to use, leave the default setting.
Understanding DNS Record Names
@ (Root Domain): Usually represents your main domain, such as
example.com.www: Represents the
wwwsubdomain, such aswww.example.com.
Some DNS providers automatically add your domain name to the hostname you enter. Check your provider's instructions to avoid entering the domain name twice.
Step 2: Choose the DNS Record You Need
Different DNS records serve different purposes. Choose the appropriate record based on the instructions provided by your hosting or service provider.
1. A Record
An A record connects your domain or subdomain to an IPv4 address. It is commonly used to point a website to its hosting server.
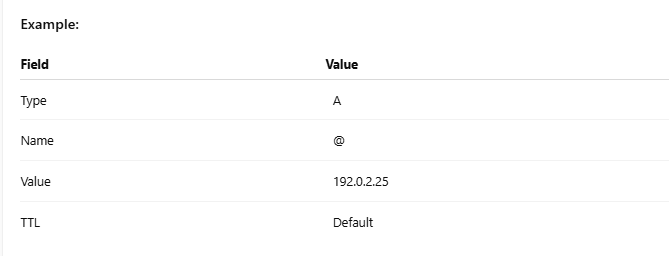
In this example, @ represents the root domain (example.com), while 192.0.2.25 represents the server's IP address.
To point a subdomain, such as app.example.com, to the same server, you can create another A record using app as the name.
2. CNAME Record
A CNAME record points one hostname to another hostname instead of directly to an IP address. It is commonly used for subdomains such as www or when connecting your domain to an external service.
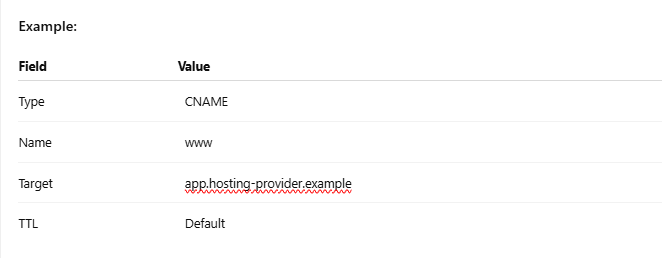
This configuration directs www.example.com to app.hosting-provider.example.
Important: You cannot create a CNAME record alongside other record types for the same hostname. Doing so can cause DNS conflicts.
3. MX Record
An MX (Mail Exchange) record tells other mail servers where to deliver emails sent to your domain.
If you're connecting your domain to an email service, your provider will supply the MX records you need.
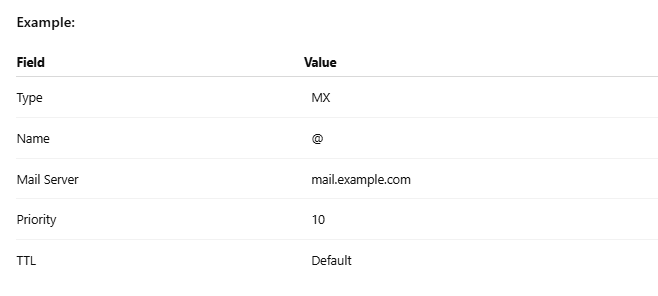
The priority determines which mail server should be tried first. A lower number indicates a higher priority.
Important: Always use the exact MX records and priorities provided by your email service provider. Incorrect settings may prevent you from receiving emails.
4. TXT Record
A TXT record stores text information associated with your domain. It is commonly used for domain verification and email security
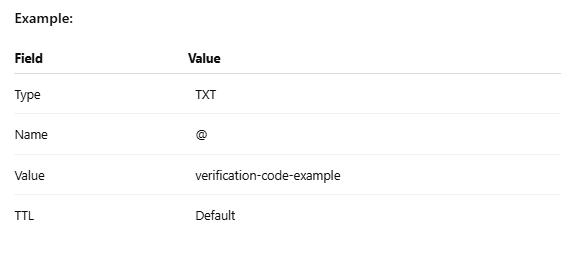
TXT records are also used for SPF, DKIM and DMARC, which help protect your domain against email spoofing and improve email authentication.
Always use the exact TXT value provided by the service you're configuring. A domain should generally have only one SPF record.
AAAA, SRV and CAA Records
You may also need to configure other DNS record types for specific services.
AAAA: Points your domain to an IPv6 address.
SRV: Specifies the server, port and other connection details for a particular service.
CAA: Specifies which Certificate Authorities are permitted to issue SSL certificates for your domain.
Only create these records when required, and ensure that you use the exact values supplied by your service provider.
Step 3: Save Your DNS Changes
After entering the required information:
Double-check the record type, hostname and value.
Confirm that any required priority or TTL settings are correct.
Click Save or Add Record.
Your new DNS record should appear in your DNS management interface once it has been saved successfully.
Step 4: Allow Time for DNS Propagation
DNS changes do not always take effect immediately. DNS servers may temporarily retain older information, even after you've updated your records.
Most changes become visible within a few hours, although propagation can take up to 24–48 hours in some cases. Nameserver changes may take longer.
If your website or email doesn't work immediately after an update, allow time for the changes to propagate before making further modifications.
JOIN WWS
Contact WWS Support if you need assistance. Include your domain name, the service you are connecting, the required DNS records, and any relevant error messages. Always verify DNS values before saving changes, especially for live websites and business email.
Get Started with WWS